Table of Content
- Table of Content
SAP System Setup
After the successful installation of S1SEVEN DMP, transaction /UBC/SETUP_BASIC is to be called.
The task list /UBC/S17_SETUP then guides through the steps required for setting up Unified Backend Connector at your system and enabling S1SEVEN use cases technically. Executing this task list is required for each client in the system to set up S1SEVEN DMP. There is another task list for setting up all the S1SEVEN proxy related configuration called /UBC/S17_SETUP_PROXY. Basically, /UBC/S17_SETUP is for system setup configuration and needs to be executed once in a system/client. /UBC/S17_SETUP_PROXY is to be executed when a S1SEVEN stack needs to be connected. Usually the second one is also executed once in a client, but depends on wether multiple companies are connected to one client. The steps are documented in the system itself. The documentation can be opened by pressing the button in column "Help". Some steps are automatic, which means the system executes the step itself without any user interaction needed. Other steps are manual and require confirmation. These steps are indicated by the Person symbol in column Status.

To start configuring UBC using the task list, click on Execute. As soon as a step with manual activities is active, click on the button in column "Status" and confirm the manual activity described in the documentation. Some steps are GUI-tasks which are semi-automatic steps that require input data at a previous stage. The execution is to be performed in dialog, and not in background mode.
System Setup with /UBC/S17_SETUP
 See step documentation below for the details.
- Activate BC-Set /UBC/S17 - automatic task BC-Set /UBC/S17 will be activated. During the activation, you will be prompted for a workbench and customizing request.
- bgRFC configuration for REST channel - automatic task with input Creates bgRFC inbound destination and scheduler /UBC/S17_REST_CHANNEL. Limited to 1 workprocess. All notarization events are using this destination to decouple workflow and actual posting of data.
- MQTT daemon setup (only for Direct Scenario, not by using Middlewar) - automatic task with input Using an S/4 system, a daemon can be scheduled to receive MQTT events. Default for S/4 systems. Make sure to specify RFC destination for user executing daemon (role /UBC/SERVICE recommended). The given server group has to make sure that only one application server is assigned. Daemon must only run once per client! See the step documentation for details.
- Schedule MQTT Job (only for Direct Scenario, not by using Middleware) - automatic task with input Using an ECC system, daemons cannot be used. Instead, make use of periodically scheduled jobs using this task list. Default for ECC systems.
- Check if needed system configuration was done - automatic task with input Choose the scenario in the parameters. Middleware or Direct?
- Direct Scenario (calling S1SEVEN API directly, MQTT/Webhook for inbound)
- The profile parameter
icm/HTTPS/client_sni_enabledneeds to be set - MQTT was setup correctly (either by Job or by Daemon), see previous steps
- The profile parameter
- Middleware Scenario (e.g., Integration Suite) No specific check needed, please check your Middelware settings.
- Direct Scenario (calling S1SEVEN API directly, MQTT/Webhook for inbound)
Proxy Setup with /UBC/S17_SETUP_PROXY
You can use this task list for newly setting up a connection to S1SEVEN or if any of the details needs to be changed. (create/update) You can update this task list for every company created in S1SEVEN portal.
Please sign up at S1SEVEN Platform and
- Setup an issuer
- Setup applications and access tokens Currently we recommend to tick all scopes for
certificatesand to tickidentities:read_manyandidentities:read_one.
Proceed with transaction /UBC/S17_SETUP_PROXY: 
- Configure S1SEVEN proxy - automatic task with input
 (depends on Scenario - Direct or Middleware)
 - Company ID On S1SEVEN Platform, navigate to "Automate"->"Constants" and copy "Company ID":

- Company Code This is just an informative and optional field in order to link the S1SEVEN proxy to a SAP company code. Its an optional field to easily choose from a list of proxies by SAP company code in a custom implementation.
- Mode Choose processing mode
liveortestTODO please add details or ref to document describing mode? - Chosse from one of the following Scenarios. Wether to connect directly or connect via Middleware (as e.g., SAP Integration Suite)
- Scenario Direct
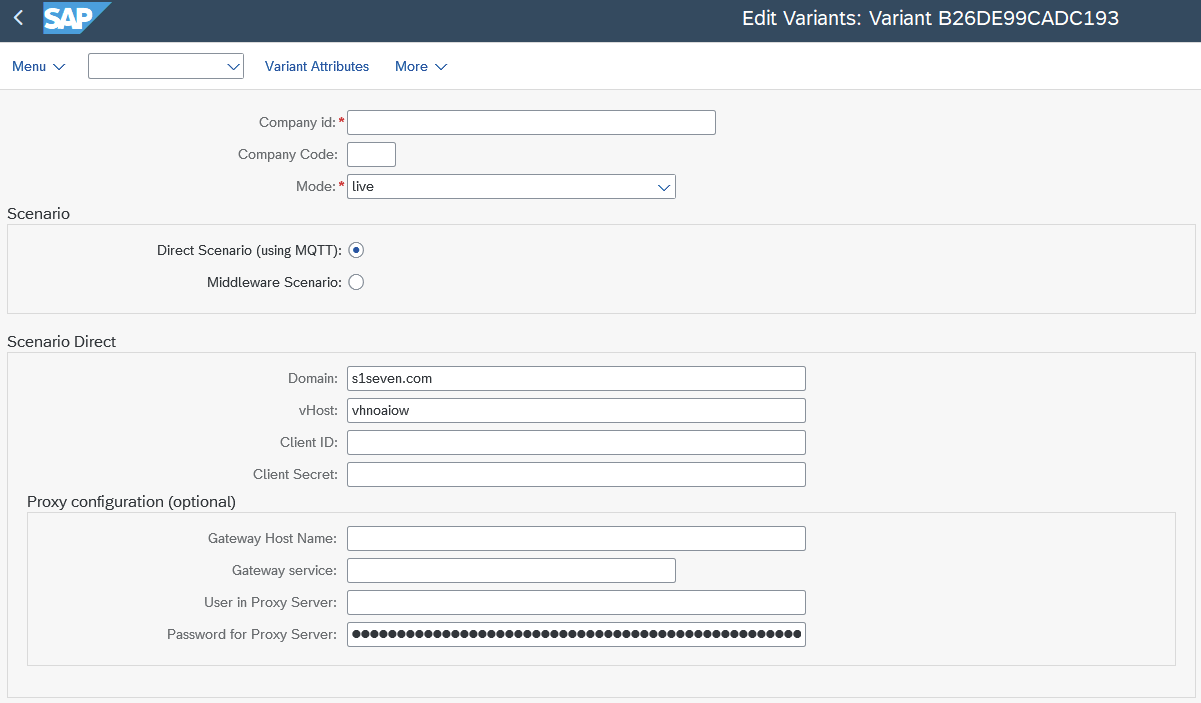 Means that SAP is connecting directly to S1SEVEN API. MQTT is used for receiving "inbound" messages (see above Connectivity).
 - Domain (mandatory) Enter app.s1seven.com. If you connect from the SAP test system is the productive environment and also the best option for all kind of testing SAP processes. Consider using mode
testin test SAP environment. - vHost (mandatory) Needed to connect with MQTT, please ask for the vHost by sending email to support@s1seven.com.
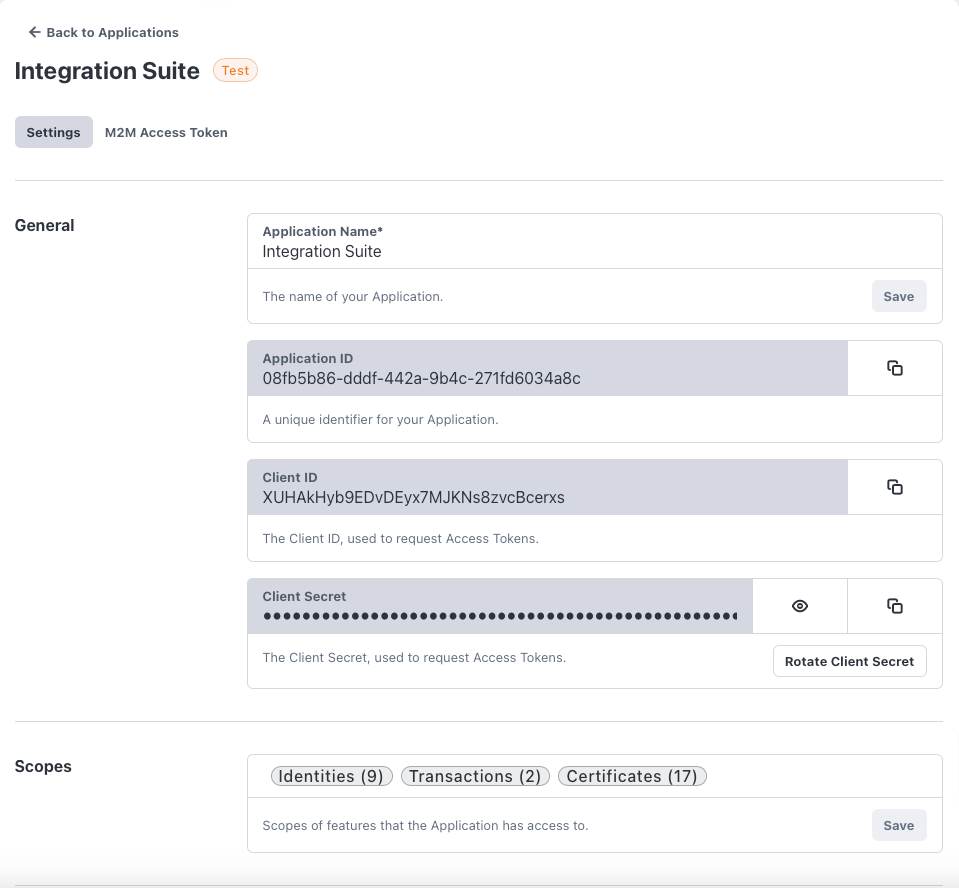
- ClientId and ClientSecret (mandatory) Please review instructions in the S1SEVEN User Manual. Copy "Client ID" and "Client Secret" from your previously created Application.

- Add optional proxy/gateway settings, if needed. Please consult the SAP Basis Team.
- Domain (mandatory) Enter app.s1seven.com. If you connect from the SAP test system is the productive environment and also the best option for all kind of testing SAP processes. Consider using mode
- Scenario Middleware
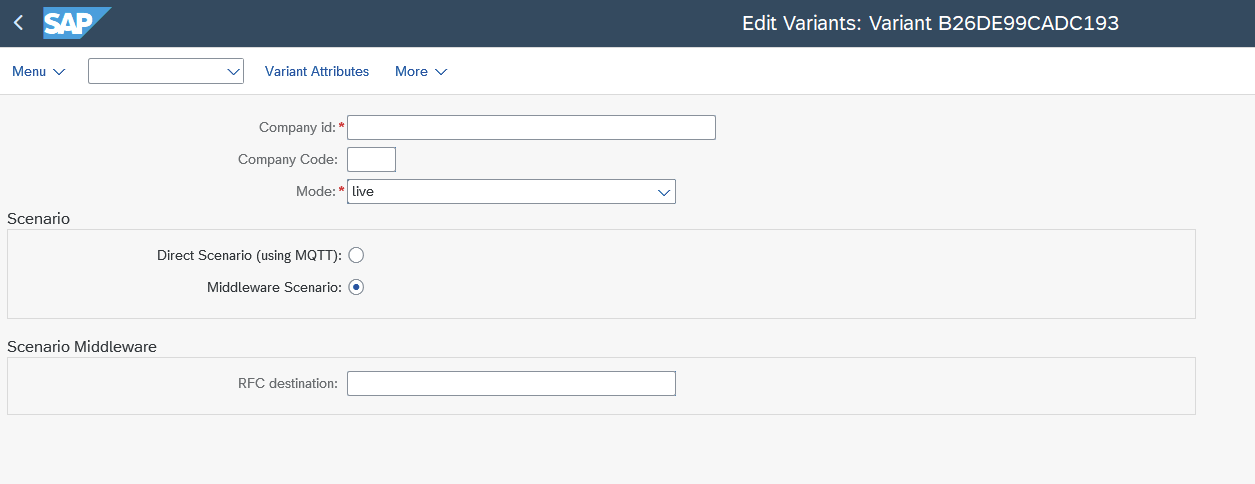 Means that SAP is connecting not directly to S1SEVEN, but with Middleware instead (which is then forwarding the request synchronously to S1SEVEN). Webhook is used for receiving "inbound" messages (see above Connectivity).
 - RFC destination (mandatory) Pointing to "base" URL resolving to app.s1seven.* (e.g. app.s1seven.com). Please note, that for every request the specific endpoint is added to the base URL specified by RFC destination. (e.g. /api/health is added for health check). Example:
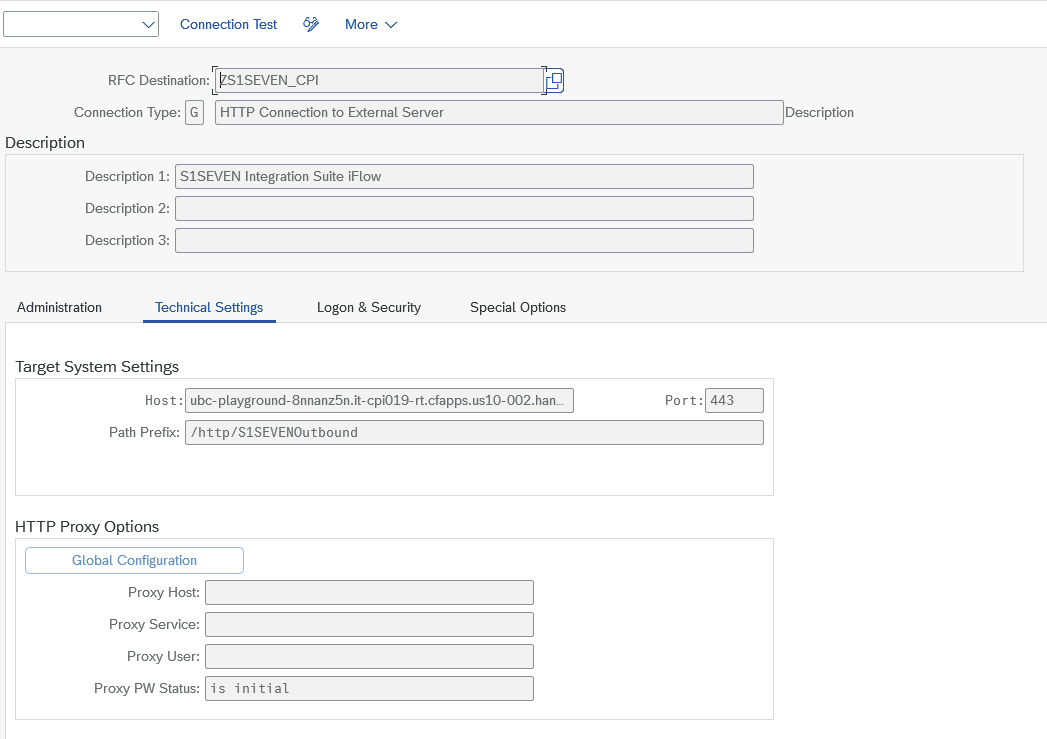
- RFC destination (mandatory) Pointing to "base" URL resolving to app.s1seven.* (e.g. app.s1seven.com). Please note, that for every request the specific endpoint is added to the base URL specified by RFC destination. (e.g. /api/health is added for health check). Example:
- Scenario Direct
- Company ID On S1SEVEN Platform, navigate to "Automate"->"Constants" and copy "Company ID":
- Store identity in configuration - automatic task Currently the last identity is used and stored in UBC configuration table
/UBC/PROXY. If the identity changes, this step needs to be executed again. TODO please add some more details/correct? - Daemon restart after configuration changes, only for "Direct Scenario" - manual task
- If there is a running daemon it needs to be restarted after the configuration were changed.
- To do so, go to transaction SMDAEMON.
- See step documentation for further details.
- Check health - automatic task
- Health check service is called to verify if setup was done successfully.
- After executing all these steps, the setup is completed. The system is basically ready for usage with S1SEVEN scenario.
Certificate Configuration/Implementation instructions
S1SEVEN DMP allows to configure more than one type of certificate in the system:
- Go to transaction
/UBC/CUSTOMIZING, Business object. Create a new entry, e.g.: Note that the object type does not need to follow any naming convention and can be freely defined.
 - Enter category 2 which defines that this object is used as a
certificate. - Enter
object typeandpath to id(in dot notation in context of the chosen payload) which defines the link to an SAP standard object. This is optional, but required to make the workflow visible in GOS workflows for the specific object. For example, the delivery number is namedbelnrand given as ainputthe path would beinput.belnr. All certificates triggered for those delivery will be show in it's GOS-UI. - Enter the implementation class for the certificate, which handles actions like
after notarizationor the mapping itself.- Inherit the class from appropriate super class, which depends on whether it is an outbound case:
/UBC/CL_S17_BO_CERT_OUT_ABS, or an inbound case:/UBC/CL_S17_BO_CERT_IN_ABS. Please note that for outbound it further will be refined wether to use IDOC or a freestyle trigger, see below. - Generate ABAP types for the JSON schema which will be used. This enables the usage of the JSON schema in a very well known way for any ABAP developer: Generating dedicated static types. To do so, call transaction
/UBC/SCHEMA_STRUCT_G: You have two options for supplying the schema definitions defined in
 Schema Id:- Choose "Http call", if the schema definitions URLs are reachable from your SAP system. In this case, SAP just downloads the definitions and alle the used references. No further input needed.
- Choose "File upload", if the schema definitions URLs are not reachable froom your SAP system. In this case, you will be prompted for every schema definition which is used. Just open the link to the schema you are prompted it in your browser, copy and paste the content and confirm the popup. The output of this report will be a list of types statements, which then just have to be pasted into the previously created class and/or a global interface. Make sure to use the "top" type in your implementation, in this example
s_schema.
- Inherit the class from appropriate super class, which depends on whether it is an outbound case:
- Navigate to
attributes- Define schema which will be used to determine certificate implementation. This needs to be unique across all configured objects. Figure 15: Schema definition for certificate example

- (optional step), redefine Mode on object level The mode used for Notarization of Certificates is defined at proxy level. It can be redefined with creating an attribute
MODE. Possible values areliveandtest.
- Define schema which will be used to determine certificate implementation. This needs to be unique across all configured objects. Figure 15: Schema definition for certificate example
Outbound case - issuing/notarizing Certificates
- Create a new class and choose the matching super class, see in below sections.
- Specify a type for the JSON schema generated earlier (with the help of
/UBC/SCHEMA_STRUCT_G) in methodcreate_type_certificate - Construct a new Mapper implementation in method
create_mapper_certificate, which inherits from the matching super class, see below. It is intended to map all the fields based on your input (IDOC/print program/freestyle) to a certificate structure. - The method
process_notarized_certificateis called after the successful notarization. It is intended to be used for follow-up actions like "storing PDF at SAP object level".
Omit JSON JSON data is transmitted besides the PDF document by default. This behavior can be changed and controlled for a specific customer, see example implementations mentioned below and method /ubc/if_s17_bo~should_omit_json( ). If you want to omit the JSON for a specific customer, redefine the mentionend method. Our best practice is to read the flag from a predefined Customizing table which needs to be filled, see the example implementations.
For maintaining the Attribute for a specific Customer, please have a look at /UBC/CUSTOMIZING -> "S1SEVEN" -> "Customer Attributes".  The customizing should be pretty straightforward. Please note that empty cells for Company id or Customer can be seen as a "wildcard".
Multiple Companies If only one Company was registered in Proxy Setup with /UBC/S17_SETUP_PROXY, the addon chooses the one and only company automatically. If more than one company was registered, obviously any point has to define the correct company. We recommend to link a SAP company code to the Proxy during setup tasklist. SAP Company code is only an informative field, but a flexible way to link SAP companies to S1SEVEN company ids without any logic or configuration changes after all.
If multiple Companies were registered, it is mandatory to add some logic to choose the proxy.
In the new BO class you will create below, redefine method choose_proxy_by_input. It is meant to choose from a list of proxies based on given input data. Cast the generic input data to the concrete type you chose in your implementation method create_type_input. See /UBC/CL_S17_BO_CERT_OUT_IDOCEX for an example implementation to copy from (its based on SAP Company code linkage, but you are free to determine that differently, e.g. Customizing/BRF+).
Print program/freestyle integration
In the standard delivery, we offer an integration for a print program on an outbound delivery item. When issuing the message, the notarization of a certificate will be started. Preview is also supported, in this case the mapping gets executed and the rendered PDF will be shown directly without notarizing a certificate. For other use cases than for outbound delivery item, you can use the program /UBC/S17_PRINT_DELIVERY_ITEM as a template. Get in touch with us! Setting up the print program integration for outbound delivery needs the following steps:
Go to transaction
NACE-> "Output Types" and customize a new output type (or reuse an existing one) Here is an example: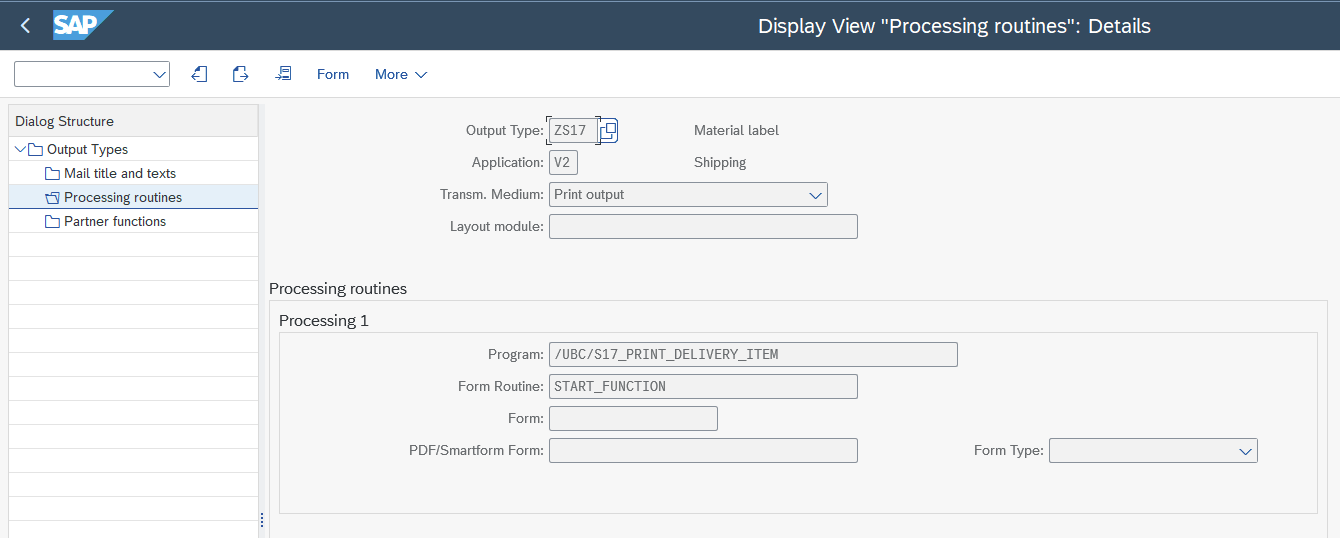 Use the program
 /UBC/S17_PRINT_DELIVERY_ITEMand form routineSTART_FUNCTION(optionally) define Condition records in
NACE- customer dependent, as by SAP standardGo to your business object in transaction
/UBC/CUSTOMIZING-> "Business object configuration" and then to "Attributes" in the view clusterCreate new entries for
KAPPLandKSCHL, specifying your previous "Output type" customizingYour business object is now linked to your output type

- Make sure your Business object implementation (on level "Business object" in view cluster) inherits from
/UBC/CL_S17_BO_CERT_OUT_PR_DI. - Return an object inheriting from
/UBC/CL_S17_BO_CERT_OUT_PRM_DIincreate_mapper_certificateIn the methodmap_dlvry_item_to_certificatedo all the necessary mapping from the givenQCERTstructure to the S1SEVEN schema
See template classes
/UBC/CL_S17_BO_CERT_OUT_EXand/UBC/CL_S17_BO_CERT_OUT_MAP_EXfor example implementations.
IDOC integration
For outbound use cases, an IDOC integration is also offered. The implementation details can be found in the package /UBC/S1SEVEN_EXAMPLE. The classes /UBC/CL_S17_BO_CERT_OUT_IDOCEX and /UBC/CL_S17_BO_CERT_OUT_IDMPEX are relevant, whereas /UBC/CL_S17_BO_CERT_OUT_IDOCEX is the starting point. The super class for your outbound BO class should be just /UBC/CL_S17_BO_CERT_OUT_IDOC_A. The input is dynamic and typed with the one specified in create_type_idoc. The mapping class itself inherits from /UBC/CL_S17_BO_CERT_OUT_MAP_EX. The example shows an integration for an DELVRY03 IDOC output. The following steps are needed:
- call transaction
WE20(Partner profiles) and do the necessary ALE/message control configuration. As in SAP standard, it is completely up to you wether to configure for a single customer or a "logical system". In this example, "logical system" is used. The IDOC is sent to UBC by setting "Receiver port" =/UBC/IDOC. Summary: Leave all the ALE settings "as is", just swap to "Receiver port"
 /UBC/IDOC. - Set IDOC Basic type (+ optional extension) for your business object in transaction
/UBC/CUSTOMIZING-> "Business object configuration". Here:DELVRY03 - Add IDOC message type to list of message type in the same view cluster for your object in "IDOC message types". Here:
DESADV - Generate type for your IDOC (basic type + extension) by using transaction
/UBC/IDOC_STRUCT_GENand construct the type in your BO implementation method forcreate_type_idoc - Do all the necessary mapping from the IDOC into the JSON schema, see also example mapping class
/UBC/CL_S17_BO_CERT_OUT_IDMPEX.
Previewing and testing for IDOCs also is supported
Based on an IDOC the PDF can also be previewed by executing transaction /UBC/S17_IDOC_PREVW. Specify values for the IDOC number you want to preview/test and the target S1SEVEN Company Id.
Inbound case - receiving Certificates
For implementation details, please see package /UBC/S1SEVEN_EXAMPLE. The class /UBC/CL_S17_BO_CERT_IN_EX is relevant.
- The method
create_type_certificatecreates the concrete type for the JSON schema generated earlier. - The method
process_inbound_certificateprocesses the data. Any validation/processing is possible.
Connectivity
Bi-directional connectivity between S1SEVEN and S1SEVEN SAP Addon needs to be ensured (basically SAP and https://app.s1seven.*/api/).
For staging S1SEVEN environment https://app.s1seven.dev For productive S1SEVEN environment https://app.s1seven.com
%%{init: {'theme':'neutral'}}%%
flowchart LR
    A[SAP Addon] -->|notarize, render, ...| B[S1SEVEN API]
The following S1SEVEN API endpoints are utilized in the exchange between S1SEVEN and SAP Connector:
POST /api/certificates/notarizeNotarize a document by calculating its hash and storing it on Blockchain.POST /api/certificates/renderRender the document as PDF or HTML document and return it in the response.POST /api/certificates/verifyVerify the integritity and authenticity of a document by calculating the hash and querying the Blockchain.POST /api/tokens/oauth2Request new M2M authentication token.POST /api/identitiesRequest new identity.GET /api/identitesRetrieve the list of created identities for signing Blockchain transactions.GET /api/healthCheck the availability of the S1SEVEN platform.
The full S1SEVEN OpenAPI documentation is available at developers.s1seven.com
%%{init: {'theme':'neutral'}}%%
flowchart LR
    A[S1SEVEN] -->|inbound certificate, notarization result| B[SAP Addon]
There are multiple options to setup bi-directional communication, wnich a have to be evaluated by the customer within its systems constraints and organizational policies. Before going into the details, S1SEVEN recommends to use MQTT if possible.
Direct communication with S1SEVEN
Direct communications means that the SAP Add.On and therefore SAP interacts directly with the S1SEVEN API, possibly using a gateway/proxy as best practice.
SAP to S1SEVEN API for outbound messages
APIs available at app.s1seven.* can be directly called from the SAP system itself. The following configurations must be applied:
- Set system parameter
icm/HTTPS/client_sni_enabled(see also note 2124480- ICM / Web Dispatcher: TLS Extension Server Name Indication (SNI) as client). This system parameter is enabled in S/4 systems by default. It is required to manually set this parameter for ECC Systems. - Import the SSL certificate of app.s1seven.* to your system (STRUST, Anonymous PSE).
S1SEVEN to SAP for inbound messages
SAP can receive inbound messages from S1SEVEN in two ways:
Messages via REST webservice calls
S1SEVEN offers the possibility to configure web hooks to which it will send data based on events like notarization or reception of certificates among others. To enable that SAP endpoints, direct or indirect by proxy, have to be exposed to the internet at least for requests coming from app.s1seven.*. This is technically possible but has two major drawbacks:
- SAP gets exposed to the internet contradicting usually all security guidelines.
- Messages might get lost due the fact that SAP is usually not 24/7 up in the same fashion as a cloud service.
Messages via MQTT over Websocket
S1SEVEN SAP DMP is able to act as a MQTT client over web socket to receive event notifications including the notarization and reception of certificates. The two most important advantages of using MQTT over REST webservices are:
- No ports on the firewall have to be opened for inbound request; by that no SAP endpoint is exposed.
- Garantueed delivery as messages are removed from queues at S1SEVEN only after SAP acknowleged the reception.
To setup MQTT there are two options available:
- Running the MQTT client as periodically scheduled job: The client (SAP system) connects to the broker, waits for messages for a predetermined number of seconds and disconnects afterwards. The job will be scheduled by initial configuration task list. Please note that this is the only technically possible option for < S/4 HANA 1809 systems, as daemons are not available.
- Running MQTT client as ABAP Daemon: An MQTT daemon runs once per client, connects to the MQTT broker and keeps the web socket connection alive.
Once a MQTT message was received, it will be acknowledged to the broker and further processing within SAP gets triggered.
Indirect Communication with S1SEVEN via Middleware
In that case all communication goes trough a middleware, which receives a request from SAP Connector and manages the interaction with S1SEVEN as illustrated below. Please note that it is important that the calls have to stay synchronously!
%%{init: {'theme':'forest'}}%%
sequenceDiagram
    autonumber
    participant SAP Connector
    participant Middleware
    participant S1SEVEN
    SAP Connector ->> Middleware: Fire request: render, notarize, verify, ...
    alt Authorization not done yet/Token expired
        Middleware ->> S1SEVEN: Authorize with Client Credentials Flow
        S1SEVEN ->> Middleware: Store Credentials for reuse within a day
    end
    Middleware ->> S1SEVEN: Fire request: render, notarize, verify, ...
    S1SEVEN ->> Middleware: Return results
    Middleware ->> SAP Connector: Return results
A Webhook is registered on S1SEVEN for events notarize_one and receive_one of scope certificates. The webhook calls an Middleware Endpoint which then calls an SAP endpoint.
%%{init: {'theme':'forest'}}%%
sequenceDiagram
    autonumber
    participant S1SEVEN
    participant Middleware
    participant SAP Connector
    S1SEVEN -> S1SEVEN: Event occured: Certificate notarized/received
    S1SEVEN -> S1SEVEN: Lookup for all registered webhooks
    S1SEVEN ->> Middleware: Trigger Webhook for "Certificate notarized/received"
    Middleware -> Middleware: Validate Webhook secret to make sure request is valid
    Middleware ->> SAP Connector: Trigger Webservice in SAP System "Event occured"
    SAP Connector -> SAP Connector: Start processing
SAP Integration Suite/Cloud Platform Integration (CPI)
Within SAP Integration Suite there are multiple ways to integrate with the SAP Connector:
- Integration Flows, iFlow -> delivered as a "Integration Package"
- Open Connector
We offer integrations for both, maintaining both versions. We recommend using the "Integration Package"/iFlows option, as it is more powerful and thus open for possible enhancements in the future.
Integration Package/iFlow
Please sign up at S1SEVEN Platform and
- Setup an issuer
- Setup applications and access tokens Currently we recommend to tick all scopes for
certificatesand to tickidentities:read_manyandidentities:read_one. - Go to Integration Suite and on the left navigation bar go to "Design" -> "Integrations"
- Click on Import and choose the Integration Package zip file downloaded from here/received from S1SEVEN The result will look like something like this:

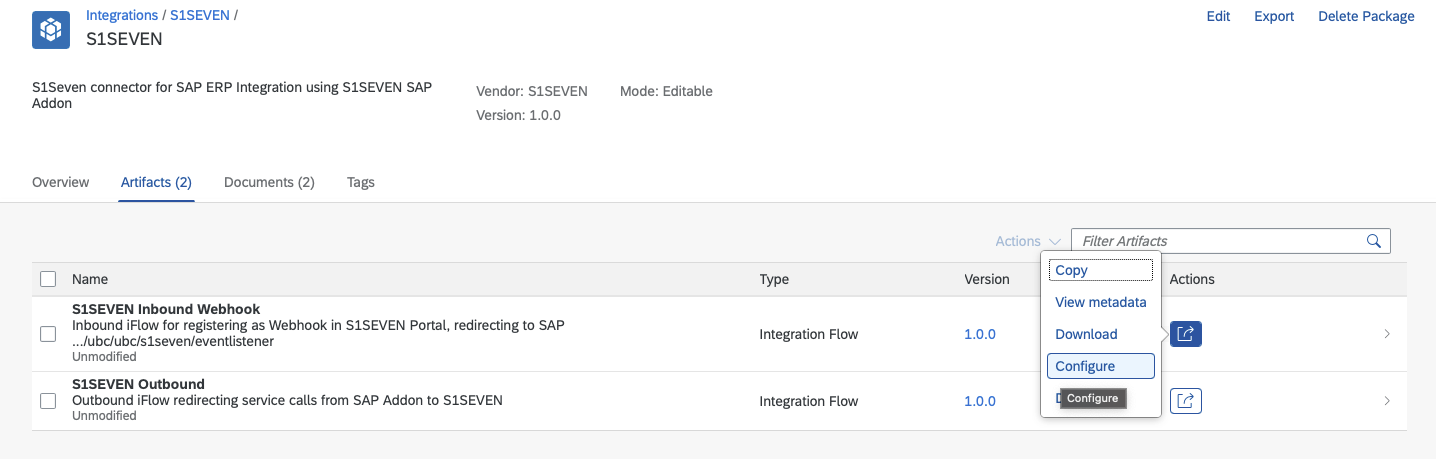
- Navigate into the created "S1SEVEN" integration package and go to tab "Artifacts"
- Choose the actions button for the first entry "S1SEVEN Inbound Webhook" and click on "Configure" This Artifact is for receiving a Webhook and forwarding the request to an SAP REST service, the endpoint will later be registered in S1SEVEN Portal.
- Review the Configuration for "Sender", change if necessary
- Switch to Tab "Receiver" and review the Configuration
- Adapt the settings in order to be able to reach the endpoint
/ubc/ubc/s1seven/eventlistenerof your SAP system - Review the Authorization detaills, and choose the Credential Name (for Integration Suite's Key Store) best fitting to your naming convention, note it down (default
S1SEVEN_SAP). The Authorization details are for connecting to the SAP system, with a high probability you can reuse existing ones (technical user) or create a new one. - Switch to tab "More" and choose the Credential Name needed for the Webhook Secret check later (Name for Integration Suite's Key Store) best fitting to your naming convention, note it down (default
S1SEVEN_WebhookSecret).For a detailed explanation see also S1Seven Documentation for Webhook. In short: Using a Webhook Secret ensures that the request comes from S1SEVEN.
- Click on "Save" and then "Deploy", confirm the "Do you want to deploy the artifact on the runtime profile Cloud Integration?" popup.
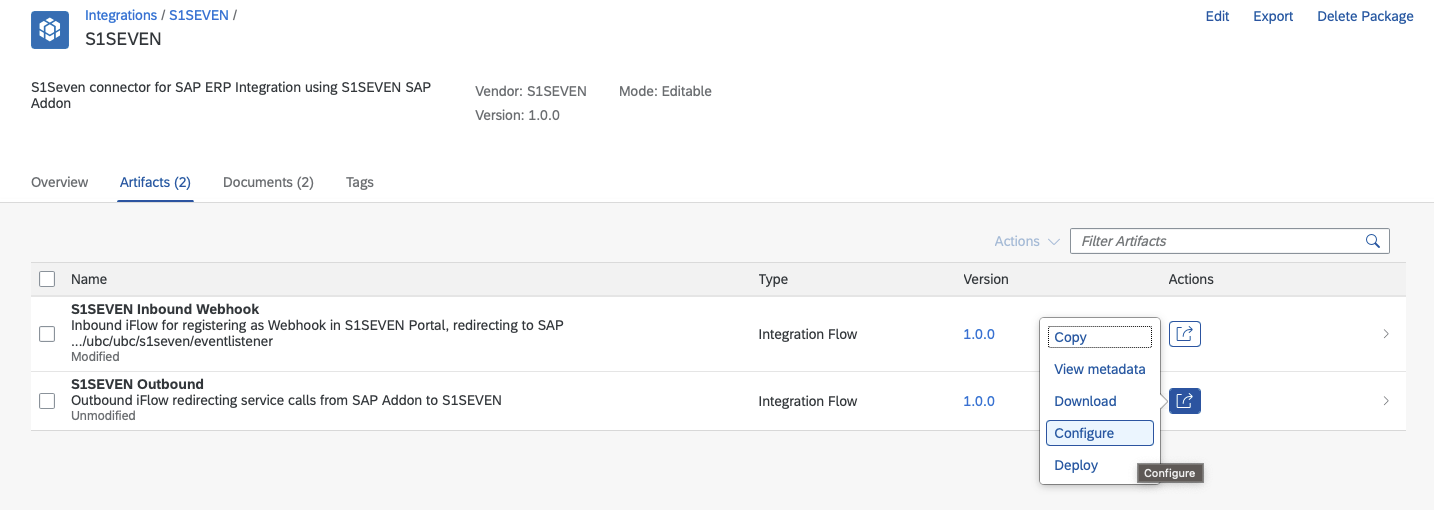
- Back in the Artifacts tab, choose the Actions button for the second entry "S1SEVEN Outbound" This Artifact is for forwarding the Requests from SAP to S1SEVEN and receiving the results.
- Review the Configuration for "Sender", change if necessary
- Switch to Tab "Receiver" and review the Configuration
- Adapt the settings for used S1SEVEN environment, in most of the cases it can just stay the default https://app.s1seven.com, pointing to the productive environment
- Review the Credential Name (for Integration Suite's Key Store) best fitting to your naming convention, note it down (default
S1SEVEN_OAuth2). The Authorization details are for connecting to the S1SEVEN stack, using OAuth2 Client Credentials flow - Click on "Save" and then "Deploy", confirm the "Do you want to deploy the artifact on the runtime profile Cloud Integration?" popup.
- In the navigation bar on the left side click on "Monitor" -> "Integrations"
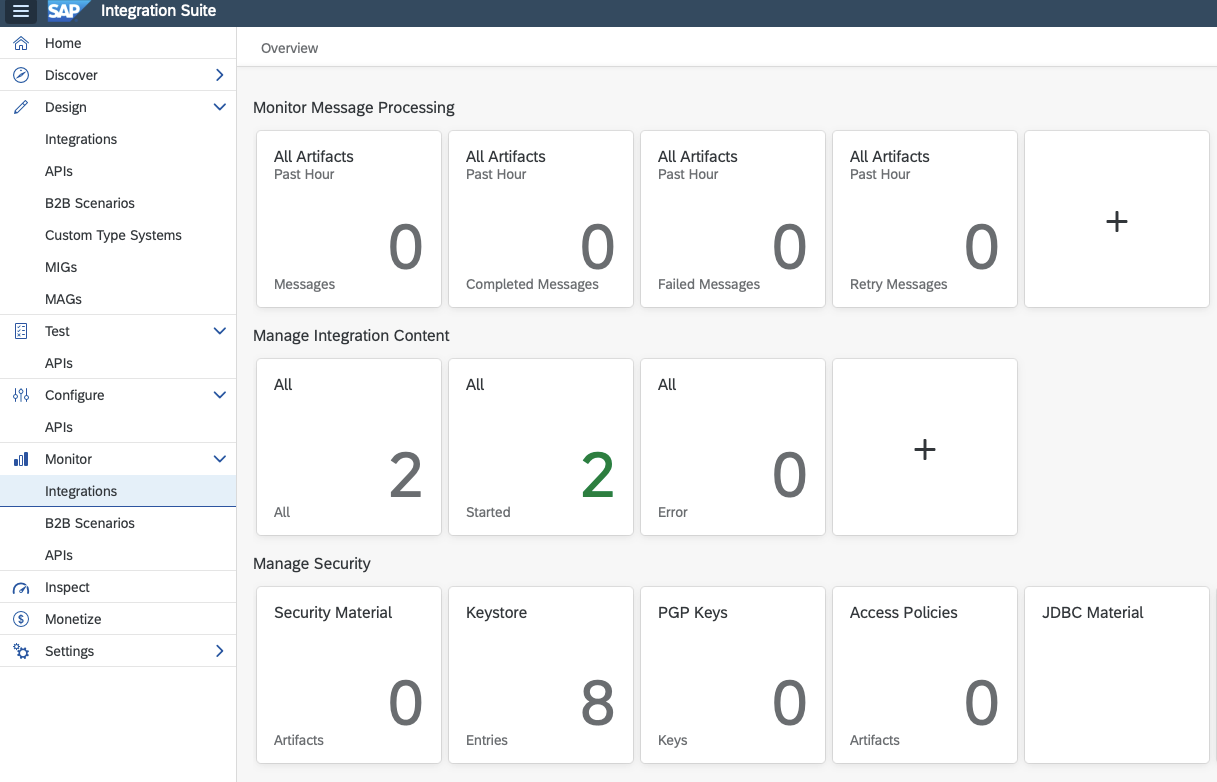
- Check that the SSL Certificate of https://app.s1seven.com is imported in "Keystore" (section "Manage Security"). Otherwise, a connection from Integration Suite to S1SEVEN is not possible.
- Back in the Overview choose "Security Material" (section "Manage Security")
- Now we create the User Credentials needed for connecting to SAP (if not already configured) Choose "Create" -> "User Credentials" Our naming suggestion for the key was
S1SEVEN_SAP, fill in all the credentials and click on "Deploy"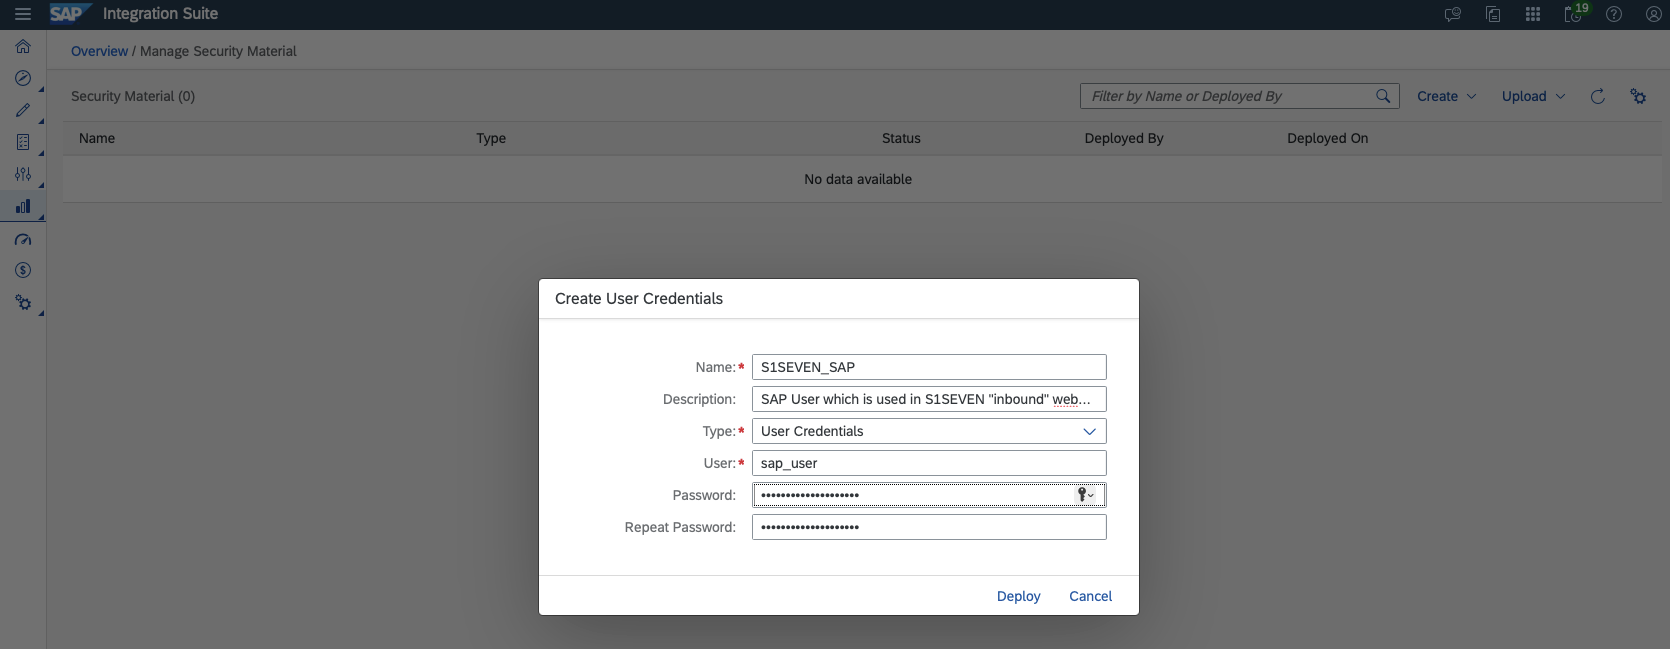
- Now we create the OAuth2 Client Credentials needed for connecting to S1SEVEN Choose "Create" -> "OAuth2 Client Credentials" Our naming suggestion for the key was
S1SEVEN_OAuth2.- Token Service Url has to match to previously configured Outbound instance (the base url has to be the same) append
/api/tokens/oauth2to the previously configured base url => e.g., https://app.s1seven.com/api/tokens/oauth2 for https://app.s1seven.com which is valid for most cases - transfer Client Id/Secret from previously created application on S1SEVEN Platform from:
 to:
to: 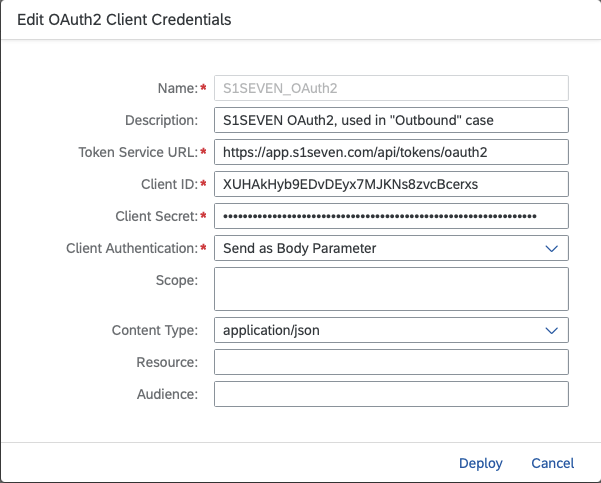
- Chosse "Send as Body Parameter" from "Client Authentication"
- the other entries can just stay the default
- click on "Deploy"
- Token Service Url has to match to previously configured Outbound instance (the base url has to be the same) append
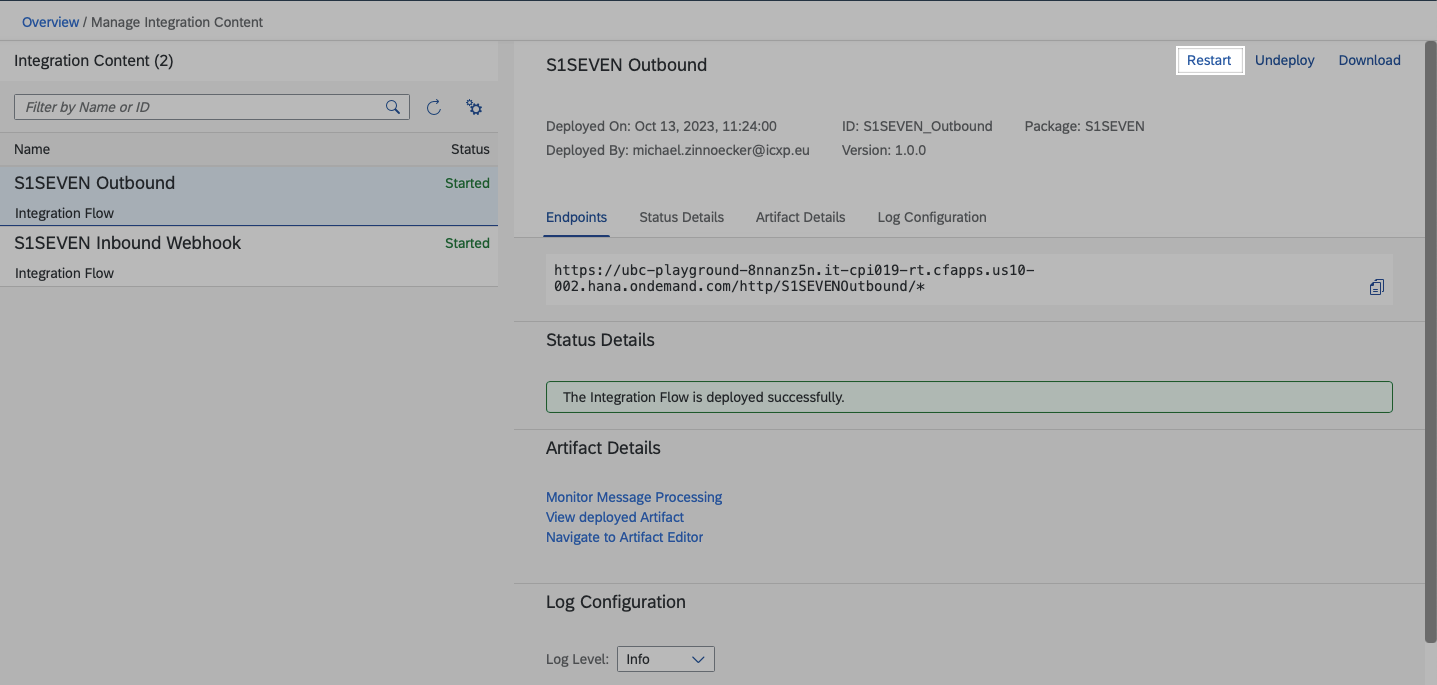
- Now we configure the webhook for events like the notarization of certificates. We need to get the URL of our "Inbound Webhook" Integration in order to register it as a webhook. On the left navigation bar go back to "Monitor" -> "Integrations"
- Choose "All" in section "Manage Integration Content" In the following screen choose the "S1SEVEN Inbound Webhook"
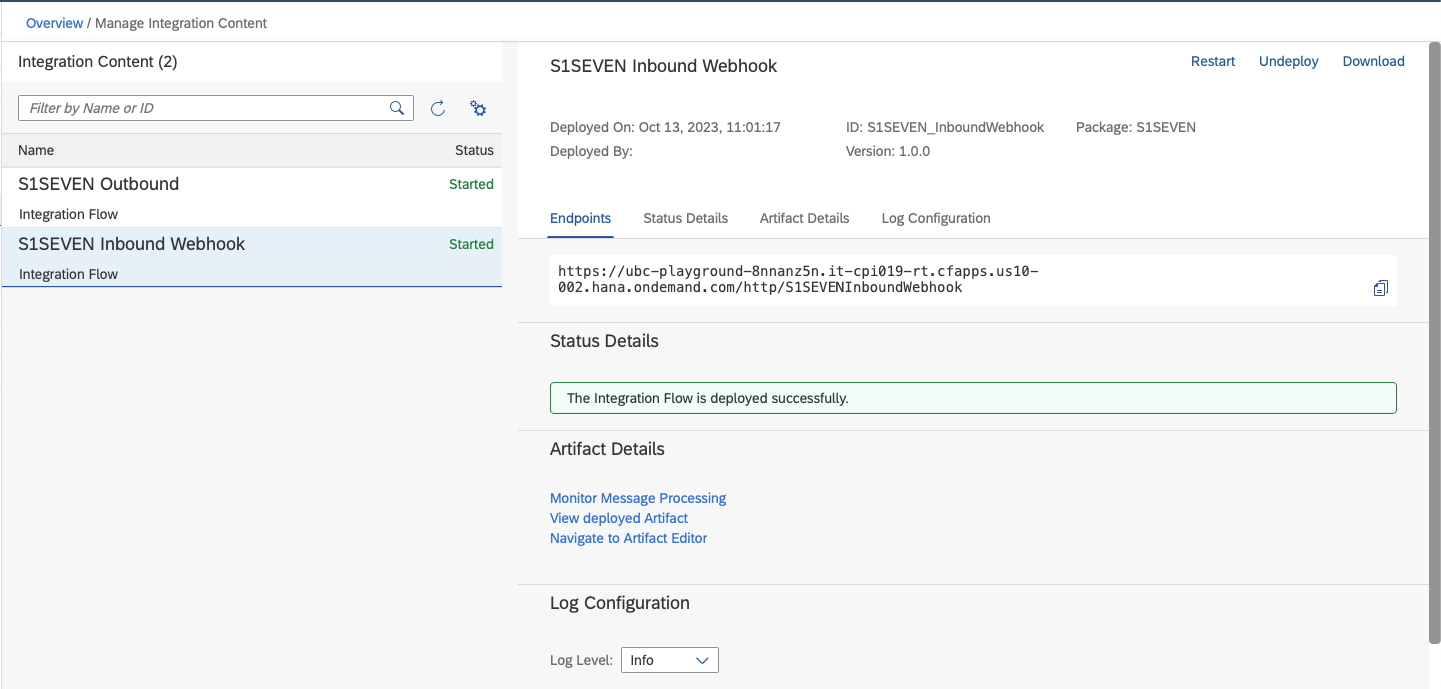
- Copy the endpoint URL
- On S1SEVEN Platform, go to "Automate" -> "Webhooks" -> "Create Webhook"
- Give a meaningful name, paste the Webhook URL and select the scopes
certificates:notarize_oneandcertificates:receive_one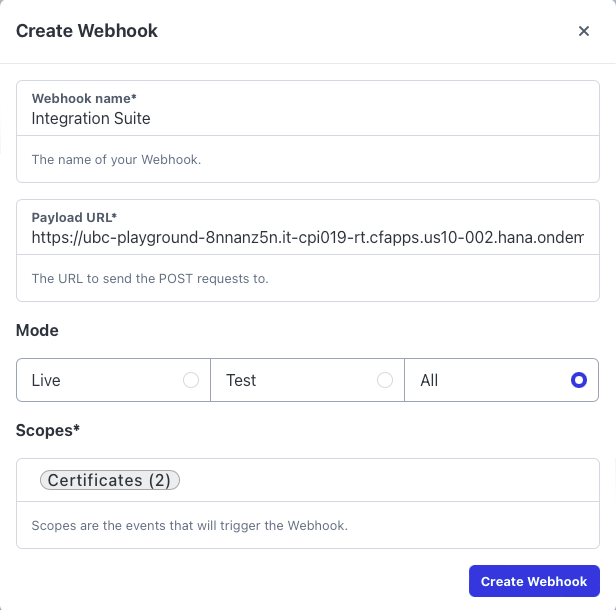
- Click on "Create Webhook"
- In section "Security", click on "Generate Secret", "Save" it and copy the secret
- Integration Suite's iFlows cannot be called directly without authentication.
Multiple options are available to overcome that point:
- The most easy way is to configure HTTP Basic Username and Password. Go to section "Custom headers" and add a header for "Authorization". The format needs to be as follows:
Basicfollowed by the base64 encoded format ofusername:password. For example:Basic dXNlcm5hbWU6cGFzc3dvcmQ=(this is the encoded format ofusername:password) You can use your preferred tool to generated the base64 encoded format like for example Postman, or an online service.
- configure OAuth2 authentication. Please get in touch with us. (TODO detailled description)
- Create an API in SAP API Management wrapping the iFlow to work without authentication. Please consider that it can cause additional costs. Usually also an API without authentication is secure enough if when using Webhook Secrets. As its the most complex setting, we usually recommend BASIC or OAuth2 configuration.. Please get in touch with us, if you need example implementation details.
- Go to Integration Suite and on the left navigation bar go to "Monitor" -> "Integrations" and again choose "Security Material" (section "Manage Security")
- Click on "Create" -> "Secure Parameter" Our naming suggestion for the key was
S1SEVEN_WebhookSecret. Paste the copied secret to "Secure Parameter" and "Repeate Secure Parameter"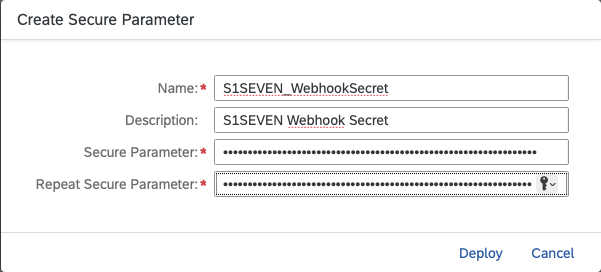 Click on "Deploy"
 - Back on the screen for "Manage Security Material" the result should look like this:

- Now we need to restart both Integrations. On the left navigation bar go back to "Monitor" -> "Integrations" Choose "All" in section "Manage Integration Content"
- Choose "S1SEVEN Inbound Webhook" and click on "Restart"
- Choose "S1SEVEN Outbound" and click on "Restart"
Note this URL, the RFC in your SAP system needs to point to this service! (without the trailing /*)
- Go to your Cloud Connector to section "Cloud To On-Premise" and expose the endpoint /ubc/ubc/s1seven/eventlistener as it is described in this SAP note
🆗 S1SEVEN Setup was completed!
Open Connector
Please sign up at S1SEVEN Platform and
- Setup an issuer
- Setup applications and access tokens Currently we recommend to tick all scopes for
certificatesand to tickidentities:read_manyandidentities:read_one. - Go to Integration Suite
- In section "Extend Non-SAP Connectivity" go to "Discover Connectors"
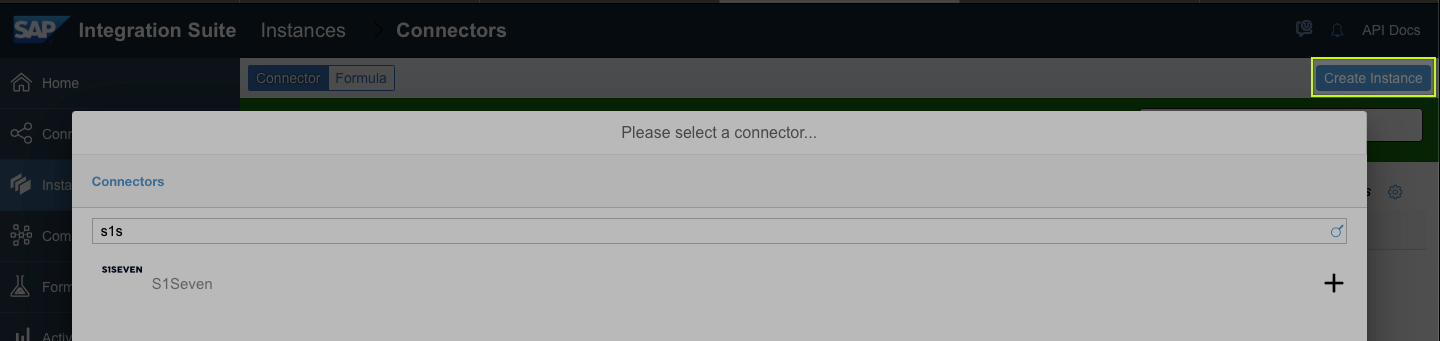
- Go to "Connectors" and click on "Build New Connector"

- Choose "Import", "Connector" and "From Computer"
- Specify the Connector json downloaded from here/received from S1SEVEN
- Click on "Continue Import" and import all the suggested resources
- Click on "Save", switch to "Instances" on the left side and create a new one
- Give a meaningful name and transfer Client Id/Secret from previously created application on S1SEVEN Platform to your connector configuration

- Leave the Event Configuration as it is for now(active, details empty).
- Save and create the instance
- Go to Connectors on the left side, mark your newly created connector and click on "Edit Instance"
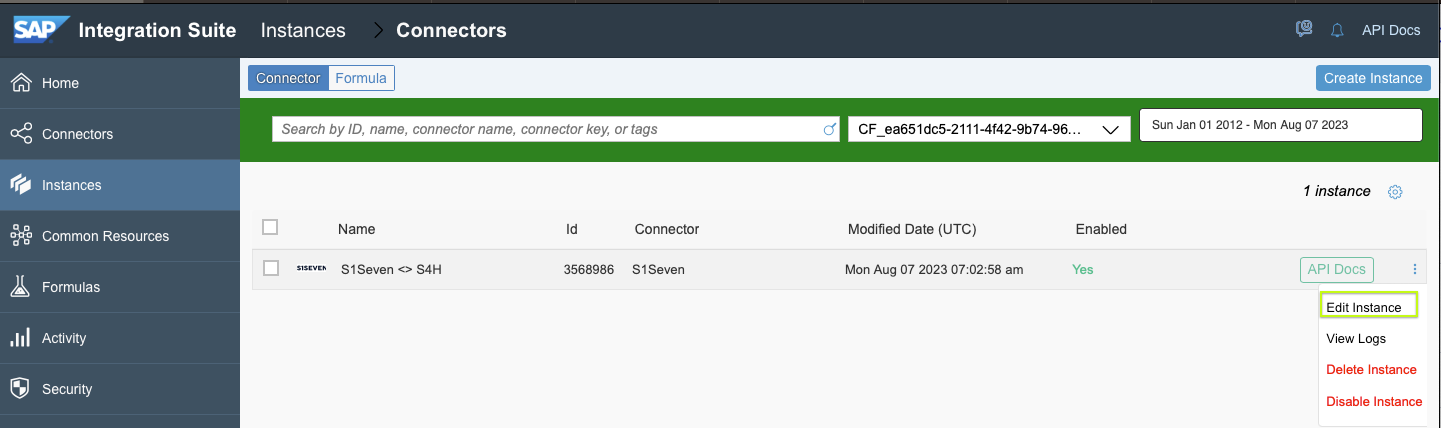
- Copy the "Webhook URL"
- On S1SEVEN Platform, go to "Automate" -> "Webhooks" -> "Create Webhook"
- Give a meaningful name, paste the Webhook URL and select the scopes
certificates:notarize_oneandcertificates:receive_one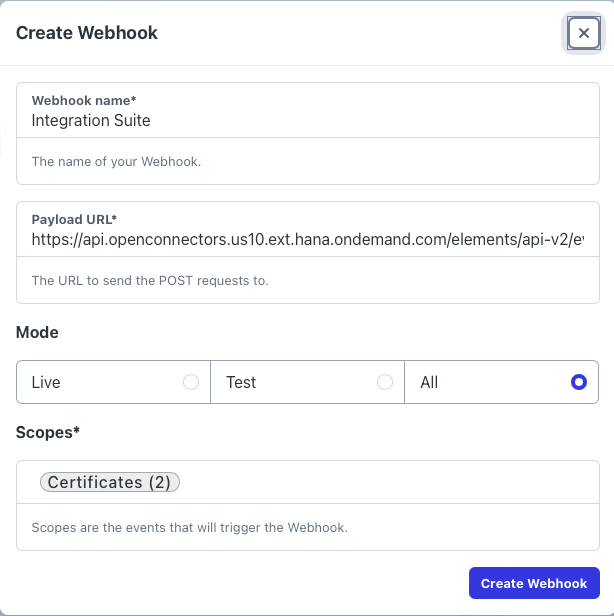
- Click on "Create Webhook"
- Now in section "Security", click on "Generate Secret", copy the secret and save the configuration Webhook Secrets are the de facto standard to be sure requests are from a dedicated use case the secret is known to.
- Invalid requests without a matching secret gets filtered out immediately within Integration Suite Connector.
- Back in Integration Suite "Edit Instance" from before, paste the Secret to "Webhook Secret"
- Paste the "Client Secret" from previously created "Application" again. Please note that "Client Secret", "Webhook Secret" and "Event Notification Basic Password" are configured as "Password" and therefore needs to be given on any configuration change
- Update the configuration Leave the other fields "Event Notification..." empty for now, as they will be adapted later in section for Inbound configuration
SAP to S1SEVEN API for outbound messages
The result will be to have one endpoint for the SAP system (configured as RFC) where all the S1SEVEN APIs are accessible. The next steps are customer dependent and therefore not documented in detail. With a high probability you want to use API management. It is possible to use Open Connectors as an API provider in Integration Suite's API management. Usually you create an API pointing to the connector's base url. For details, please see https://help.sap.com/docs/sap-api-management/sap-api-management/build-apis. This single endpoint will later on be configured in the SAP system. The connectivity settings between Integration Suite and SAP are also customer dependent: https://help.sap.com/docs/cloud-integration/sap-cloud-integration/setting-up-inbound-http-connections-integration-flow-processing
Commonly: As a result there should be one RFC destination in SAP system pointing to https://app.s1seven.* (for example https://app.s1seven.com) For example, if a service of a connector is reachable on something like https://api.openconnectors.us10.ext.hana.ondemand.com/elements/api-v2/s1seven/api/health the RFC destination should point to https://api.openconnectors.us10.ext.hana.ondemand.com/elements/api-v2/s1seven. The SAP Addon itself adds for example /api/health to the basic address while calling specific services.
S1SEVEN to SAP for inbound messages
Every Event occured in S1SEVEN needs to be dispatched to dedicated SAP resource which can be found at <<SAP>>/ubc/ubc/s1seven/isc/eventlistener. Please note: there is only one SICF node visible in SAP /ubc. With a high probability you want also to use API management. For that, please add an API pointing to <<SAP>>/ubc/ubc/s1seven/isc/eventlistener. Note down your new URL (+ Auth details) and again, switch to your previously created Connector instance and "Edit Instance". Edit the Event Notfication Details like Authorization, URL: 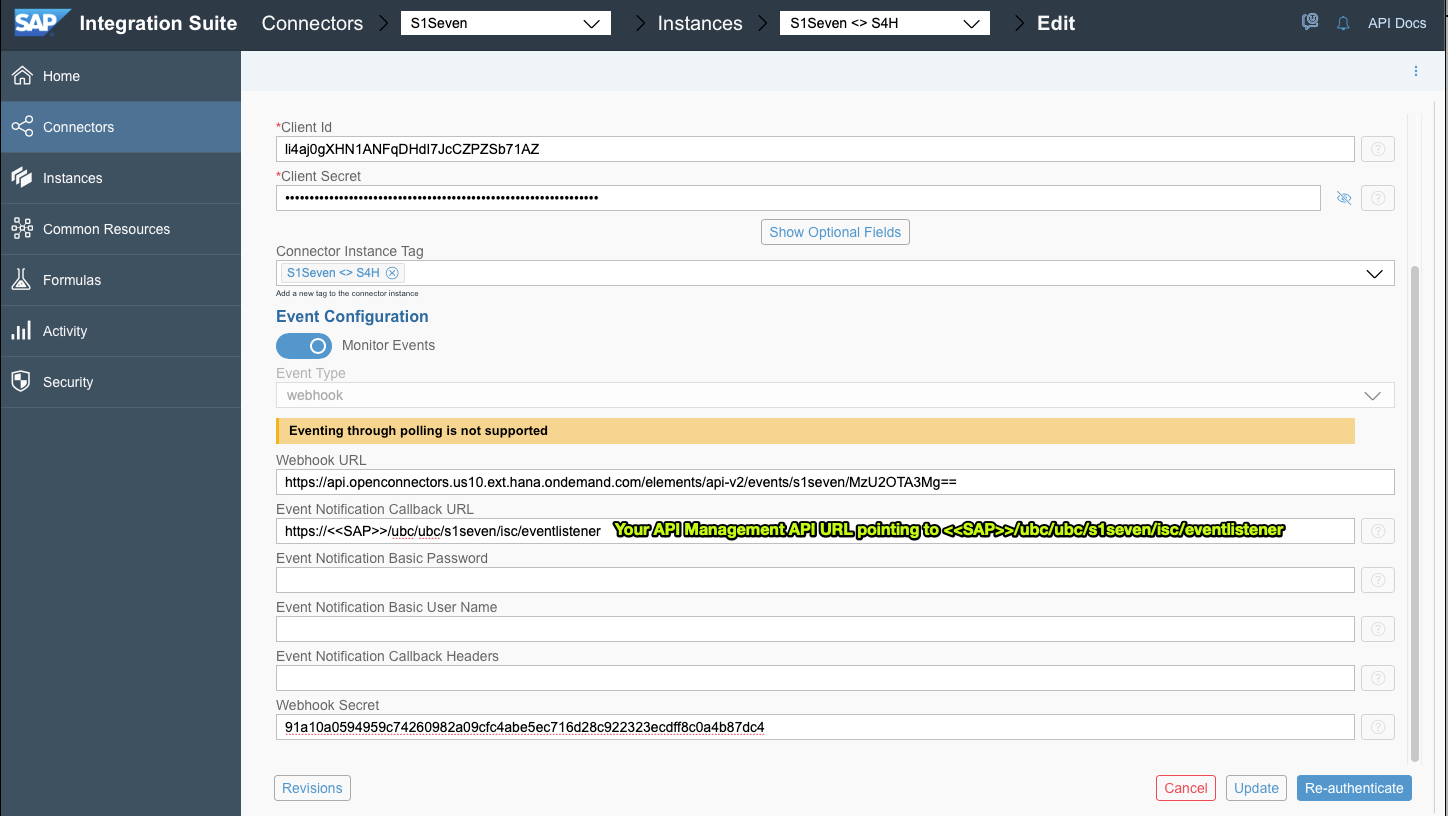
Monitoring
The standard delivery comes with a few I/O monitoring interfaces, which are accessible via transaction `/UBC/IO``. 
UBC_S17_CERT_OUTCalled for the notarization scenario. The workflow with definition80100(see/UBC/CUSTOMIZING->UBC.flow configuration) is automatically started which handles all the mapping (e.g., calling your custom methods for mapping) and notarization actions. The workflow can be easily enhanced by just adding customizing entries for any new step, e.g. an additional approval step or calling of additional external systems for retrieving data. One interface message is linked to the workflow and represents mainly the transfer, notarization and follow-up actions of a certificate to the S1SEVEN stack.UBC_S17_CERT_NOTARYThis interface is called after the successful notarization of a certificate. It mainly just logs all the notarizations and triggers follow-up actions on the workflow started withUBC_S17_CERT_OUT.UBC_S17_CERT_INCalled for inbound scenario. The workflow with definition80101(see /UBC/CUSTOMIZING -> "UBC.flow configuration") is automatically started to process the data. The handler for the business object defined in /UBC/CUSTOMIZING -> "Business object configuration" will be called, the object is chosen by the schema of the certificate which was sent. One interface message is linked to the workflow and represents mainly the transfer, mapping and follow-up actions of an inbound certificate.
Authorization
S1SEVEN SAP DMP comes with few delivered template roles. Due to the nature of PFCG roles, the roles cannot be included in the addon delivery. You can choose to:
- Import roles by file (transaction
PFCG: Role -> Upload) - Import template roles by transport request
Usually the template roles will be copied to customer specific roles, but feel free to use them directly. The following template roles will be delivered and are ready to use/copy:
/UBC/S17_MONITORIt is intended for users who need to monitor the messages issued by the addon (inbound, notarization). The role gives access to view in-/outbound messages in I/O monitoring, including the payload. This role also includes SAP standard roles to be able to access SAP Standard workflow protocols. Basic error handling activities like "restart" functionality is enabled. It is also possible to restrict by a company code in the I/O monitor. Since all messages are sent/received from/to a proxy(Company Id in S1Seven) and thus possibly for a specific company code, restirctions per company are feasible./UBC/S17_ADMINISTRATORThis role includes the monitoring role and adds the authorizations for administrating tasks, like setting up the Addon: Customizing, bgRFC configuration, .../UBC/S17_DEVELOPERThis role inlcude the administration role and adds authorizations for developer transactions, debugging etc. The role is intended for a "Addon developer" in a DEV system.
The following authorization objects in the Addon were created and used:
/UBC/IO_IFto restrict for interface usage within the I/O monitor, available fields are activity and I/O interface. The tool is quite generic, S1Seven uses only some pre delivered interfaces. That's why the I/O monitoring can be restricted to interfaces./UBC/IO_CCto restrict the display of messages in the I/O monitor for a specific company code. Please note that the company code has to be registered for the proxy. (see above, section Proxy Setup) For the standard delivery of the template roles there is no restriction for a specific company code.
Besides of that, please have a look at the roles itself. They add authorizations for the addon transactions, used standard authorization objects like for bgRFC, etc.
Data Archiving
S1SEVEN DMP comes with a dedicated Archiving Object /UBC/BOC, used to archive all the data which was persisted to monitor and control the workflow of notarization and/or inbound of certificates. As in most SAP standard applications the archive runs are scheduled within transaction SARA. The write step offers multiple options to select the messages. Please note that only data will be archived which are produced by S1SEVEN DMP and are in a completed state. The write step does not trigger data archiving of a connected business object or IDOC. The S1SEVEN DMP data archiving can also be included in customer archiving routines. All what is needed is to call methods of /UBC/IF_ARC_BOC_SERVICE in custom write programs.
Compatibility
S1SEVEN SAP Digital Material Passport compatible with the following SAP versions
- SAP S/4 Hana
- SAP ECC down to 750
S1SEVEN SAP DMP is compatible with all S1SEVEN Platform releases, see the Changelog. It supports the following digital material certificates and versions: